
How to set default printer in windows 10?
Right now remote availability and about dispensable estimating on section level printers (however ever-costly ink costs), a few of us will undoubtedly have more than one gadget accessible to print to.
Windows 10, in its unending insight, will set your default printer to the one utilized most as of late at the present area. This can be a torment for clients who will in general print a dominant part of reports on one kind of printer and utilize an alternate one every so often. While basically changing which gadget to print to is a simple workaround, some may simply need to print to one essential gadget constantly.
Windows will consequently set your printer to be the last one you utilized in your present area. Nonetheless, you can kill this capacity to physically set your printer to a favored one, so it doesn’t change each time you move.
You can likewise re-empower that default setting later if that is your inclination.
Step to set the default printer in Windows 10:
- Stage 1: Press the Windows key on your console or snap the Windows symbol at the base left of your screen, and a quest for “Printers.”
- Stage 2: Select “Printers and Scanners” from your query items.
- Stage 3: Uncheck “Permit Windows to deal with my default printer” at the base of the screen by tapping the checkbox.
- Stage 4: Select the gadget you need to make your default from the rundown of printers and scanners. Snap-on it, at that point click “Manage.”
- Stage 5: On the new screen, select “Set as default.” This should now be your default printer.
- Stage 6: To re-empower the default printer settings, reevaluate the “Permit Windows to deal with my default printer” button.

How to Set the Default Printer on Your Windows 10 Laptop?
The default printer may show up as a symbol alongside different printers in the different “show me your printers” windows. To set the default printer, follow these means:
Stage 1: Open the Control Panel.
- Right-click the mouse in the lower-left corner of the screen to show the super-secret menu. Pick Control Panel from the spring up menu.
Stage 2: Beneath the heading Hardware and Sound, click the connection View Devices and Printers.
- You see the Devices and Printers window.
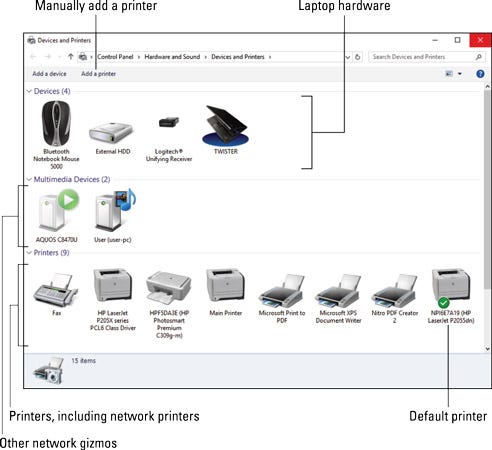
Stage 3: Right-click the printer you need to use as the default printer.
Stage 4: Chose the Set As Default Printer direction.
- That printer is presently the new default printer. It sports a green checkmark symbol.
This can be extremely useful on the off chance that you have a workstation that switches printers a great deal. Changing the default printer physically like this despite everything permits you to change your printer dependent upon the situation on the off chance that you decide to, at whatever point you print from an application.
Thank you so much for reading, Clap for this post, if you find this helpful. And for more information call at +1–888–625–2848
SOURCE: https://medium.com/@wells47/set-default-printer-windows-2237a448f204


